Automate BPA Server works hand-in-hand with Automate Agents in order to execute workflows and perform tasks across a network environment. The Agent's main purpose is to perform triggering, workflow, and task execution, either locally or on a remote machine. An Agent has no graphic user interface. It simply resides on the machine and quietly runs in the background until it is called upon by BPA Server to execute a workflow or complete a task. Agents also detect conditions that can initiate workflows, so communication between Server and Agents works in both directions.
BPA Server is intuitive enough to permit a task or condition to execute on different Agents within the same workflow. To enable such unique multi-machine capabilities, the Server component connects with Agents through TCP/IP. This is setup via the BPA Server Management Console (SMC), which is the interface used for development, design, and administration. In order to allow all of these wonderful Server / Agent capabilities to take effect, Agents must first be installed on the remote (or local) machines. This article will discuss the two methods in which Agent deployment and installation can be established as well as provide some insight regarding the information required to accomplish this procedure.
Method #1
The first method of properly installing an Agent can be achieved via the Automate BPA Server setup process. If using this method, you must first download or copy the Automate BPA Server installation file onto the machine in which you would like to install an Agent. If using an installation CD, simply place the disk in the CD-Rom drive of that machine.
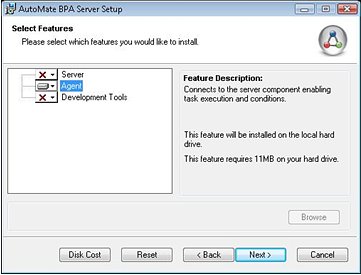
During the BPA Server Setup process, a window will appear allowing you to select which features to install or disable. Click the icon next to the 'Server' feature and select "Entire feature will be unavailable." Do the same with the 'Development Tools' feature. A red "X" should replace the icons for those features signifying that they will not be installed. Only the 'Agent' (which should not include a red "X") will be installed.
Note: If you wish to install the Agent on the same machine in which you want the BPA Server component and/or Development Client (SMC) to reside, simply enable the appropriate feature(s) during installation. All three components can be installed on the same machine or they can be installed separately on different machines. Keep in mind that only registered Agents can perform automation services of a workflow.
In the next window, you will need to enter the following Agent configuration information:

1. Agent Name: The name of this Agent as it will appear in the BPA Server Management Console. The default value entered in this field is the computer name of the machine in which the Agent is being installed.
2. Automate BPA Server Hostname: The hostname of the computer on which the BPA server resides. The default value entered in this field is "localhost," which specifies that BPA Server is installed or will be installed on this machine. Therefore, if BPA Server resides on a separate machine, make sure to modify this value to point to the hostname of that machine.
3. Automate BPA Server Port: The port number that BPA Server will use to connect to this Agent. The default value entered in this field is "7100."
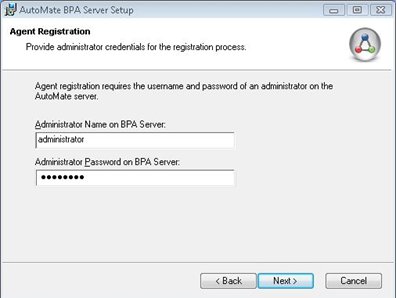
The next window will prompt you to provide administrator credentials in order to properly register this Agent. Registration of an Agent requires the username and password of a default administrator used on the machine where the BPA Server resides. After this has been accomplished, click "Next" to complete the installation process.
Method #2
The second method of installing an Agent would be through the Automate BPA Server Management Console. From the SMC interface, click the 'Agents' option located on the left-hand window pane, which should bring up the 'Agents' view on the right-hand window. Afterward, click the "Deploy" button (marked with a blue "+" sign) which will start the 'Agent Deployment Wizard.' The wizard will help you properly deploy and install Agents on other computers on your Windows domain.

The Agent Deployment Wizard "Getting Started" window will first appear providing important information regarding the deployment process.
Note: The Deployment Wizard will work only if the following conditions are met:
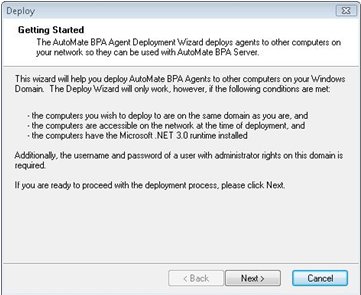
1. The computers you wish to deploy to are on the same domain as you are.
2. The computers are accessible on the network at the time of deployment.
3. The computers have the Microsoft .NET 3.0 runtime installed.
4. The username and password of a user with administrative rights to this domain is entered.
The Deployment Wizard will allow you to proceed to the next window as long it can validate that the current machine is part of a domain. Otherwise, a message will appear stating otherwise.
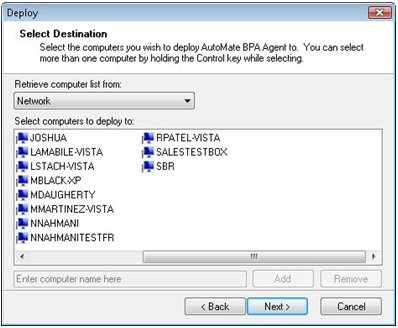
The next window that appears allows you to select the computers that you wish to deploy Automate Agents to. A dropdown menu provides the option to retrieve the computer(s) from an Active Directory list view, a network list view, or the preference to enter the computer name (or IP Address) manually. If a list view is chosen, you can select more than one computer from the list by holding down the Control key on your keyboard while selecting.
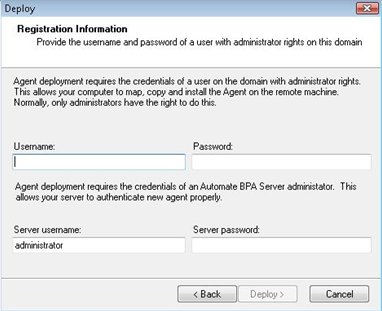
Next is the registration window, which requires that you provide suitable administrator credentials in order to properly deploy and register your Agent(s). Usually, only domain administrators have the appropriate permissions to map, copy, and install programs on a remote machine. As a result, the first set of fields requires the username and password of a user on the domain with administrative rights in order to allow Agent deployment and remote installation. The second set requires the username and password of an administrator used on the machine where the BPA Server resides. This allows your server to properly authenticate newly deployed Agent(s). Thereafter, simply click the 'Deploy' button to complete the Agent deployment process.
At the end of the deployment process, you are presented with a detailed log window which takes account of Agent deployment and installation results relating to all computers that were originally selected. This includes information with reference to all successful and failed deployment attempts along with any error messages that were a result of any failures. Additionally, all successfully deployed Agents will appear with a blue "A" icon in the 'Agents' view of the Server Management Console.
Need Help?
Visit our support page for more resources or to contact a support specialist.